Selasa, 31 Mei 2016

Cara Hard Reset Asus Zenfone C ZC451

Cara Hard Reset Asus Zenfone C ZC451


Asus Zenfone C ZC451. Salam jumpa kembali dengan guide belajar, kali ini saya akan share posting artikel tentang guide bagaimana cara melakukan Hard Reset pada Asus Zenfone C ZC451. Perlu anda ketahui bahwa jika anda melakukan proses Hard Reset maka semua data penting yang tersimpan di dalam perangkat android tersebut akan hilang atau terhapus, Proses melakukan Hard reset juga sering dikenal dengan istilah factory reset atau master reset. Saran saya, lakukan backup secara berkala terhadap semua data yang penting, Perlu anda ketahui bahwa melakukan backup dapat anda lakukan jika Smartphone masih dalam keadaan normal, dan anda tidak mungkin melakukanya dalam keadaan Bootloop pada Asus Zenfone C ZC451. Device ini merupakan smartphone dengan layar LCD 4,5 inci bekerja pada sistem Android OS, v4.4.2 (K itKat), dan prosesor Intel Atom Z2520, Dual-core 1.2 GHz dan PowerVR SGX544MP2 sebagai mesin utamanya, serta dikombinasikan dengan RAM 1 GB, kamera utama 5 MP, serta kamera sekunder vga.

Perlu anda ketahui beberapa hal sejak awal sebelum menentukan untuk membeli perangkat android baru, contohnya, bagaimana cara melakukan charge battery, cara mem-backup semua data, cara melepas SIM maupun SD Card. Hal ini tentunya penting untuk langkah berikutnya jika anda sudah memiliki smartphone yang bermasalah dikemudian hari, maka langkah awal yang harus anda lakukan adalah dengan melakukan hard reset, karena hard reset akan mengembalikan kondisi smartphone pada kondisi pengaturan pabrik. Kasus lainya mengapa anda harus melakukan hard reset adalah ketika anda hendak menjual smartphone t ersebut. Dengan melakukan hard reset akan menghapus semua data pribadi dan akun yang pernah anda daftarkan pada smartphone tersebut, sehingga anda merasa aman meskipun smartphone sudah berada di tangan orang lain.

Langkah Hard Reset Pada Asus Zenfone C ZC451 (Metode 1). 

Metode ini dapat anda lakukan jika Asus Zenfone C ZC451 dalam keadaan normal

  1. Pastikan baterai terisi dengan cukup, minimal anda bisa mencharge sampai 70%
  2. Aktifkan Asus Zenfone C smartphone
  3. Terlebih dahulu untuk melakukan Back Up pada semua data penting yang tersimpan pada smartphone.
  4. Lanjutkan dengan Masuk ke menu: Setting > Backup & reset > Factory Data Reset > Reset Phone
  5. Pilih erase everything untuk melanjutkan dan mengkonfirmasi bahwa Anda siap untuk melakukan Hard reset pada Asus Zenfone C ZC451
  6. Asus Zenfone C ZC451 akan melanjutkan proses hard reset, sampai siap untuk digunakan dalam standar pengaturan pabrik (factory default).

Langkah Hard Reset Pada Asus Zenfone C ZC451 (Metode 2). 

Metode ini hanya berlaku pada smartphone yang tidak dapat diakses menunya, mungkin karena terjadi bootloop, atau pada posisi wellcome screen yang terlupakan PIN maupun Active Pattern Locknya.
  1. Pastikan baterai terisi dengan cukup, minimal anda bisa mencharge sampai 70%
  2. Matikan Asus Zenfone C smartphone
  3. Tekan dan Tahan secara bersamaan: Tombol Power + Tombol Volume Up selama beberapa detik sampai menu teks muncul, kemudian lepaskan kedua tombol.

    Hard Reset Asus Zenfone C ZC451
    Hard Reset Asus Zenfone C ZC451
  4. Pada menu teks ini, pilih recovery dan melanjutkan dengan menekan tombol Power untuk mengkonfirmasi atau OK.
    Hard Reset Asus Zenfone C ZC451
    Hard Reset Asus Zenfone C ZC451
  5. Tekan Volume Down untuk memilih  "wipe data/factory reset", kemudian tekan Tombol Power untuk konfirmasi.

    Hard Reset Asus Zenfone C ZC451
    Hard Reset Asus Zenfone C ZC451
  6. Pilih "Yes--delete all user data". Gunakan tombol Volume Down untuk memilih dan Tombol Power untuk OK
    Hard Reset Asus Zenfone C ZC451
    Hard Reset Asus Zenfone C ZC451
  7. Untuk me-restart handphone, pilih "reboot system now".

Guide To Hard Reset Acer liquid Z205 Android Smartphone

Guide To Hard Reset Acer liquid Z205 Android Smartphone.


Hard Reset Acer liquid Z205. Todays We will explain to you how to perform hard reset on Acer liquid Z205 smartphone. Some People say that Hard reset process is call with master reset or factory reset. Many people asking why shoud we perform hard reset to our phone. The logical answer that can I say for this asking is :
  • Because we will sell our Acer liquid Z205 Android phones
  • We will give our Acer liquid Z205 away to some one else, and we dont want that one know everything about our secret data, so we have to erase all data before back up it.
  • our Acer liquid Z205 has been lagging and stuck on android logo, this call with bootloop
  • There are many bug on Acer liquid Z205.
  • We want to remove all personal data and setting that wasstored in Acer liquid Z205.device.
  • We ha ve forgotten on PIN or Patern Lock at Acer liquid Z205.
  • and many other reason.

1st Methode. Hard Reset ACER LIQUID Z205 Using Menu :

  1. Turn on ACER LIQUID Z205, by long press on power button
  2. Make sure your battery is fully charged, we recomended taht your battery has 80% power
  3. Always BackUp your important data that store in Acer liquid Z205.
  4. Go to menu: Setting > Privacy > Factory Data Reset > Reset
  5. Choose Erase everything to confirm that you have ready to do master format or hard reset on Acer liquid Z205.
  6. Acer liquid Z205. will continoued to hard reset till it back for factory default.

2nd Methode. Hard Reset ACER LIQUID Z5 DUO (Z150) using Hardware Key.


  1. Turn Off your Acer liquid Z205 Handheld first
  2. Make sure your battery is fully charged, we recomended taht your battery has 80% power
  3. Always BackUp your important data that store in Acer liquid Z205
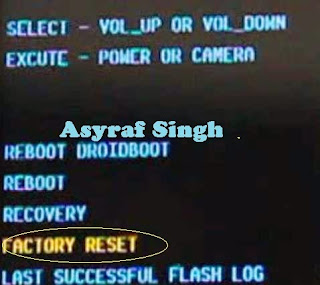
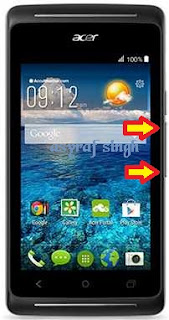
  4. Press and hold Volume Up + Volume Down together, release it when phone vibrate.

    Hard Reset Acer liquid Z205
    Hard Reset Acer liquid Z205
  5. Then, You should release held keys when new Menu appears on the sccreen
  6. Choose Recovery Mode menu. Press Volume UP to scroll to Recovery option and confirm your choice by pressing Volume Down.
    recovery menu acer liquid Z205
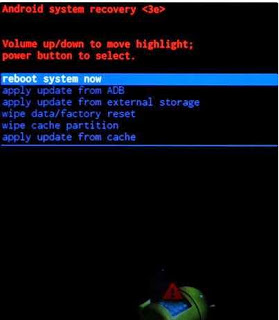
  7. Choose Wipe data/factory reset menu. Press Volume Down to scroll to Recovery option and confirm your choice by pressing Power Button.
    Hard Reset Acer liquid Z205.
    Hard Reset Acer liquid Z205.
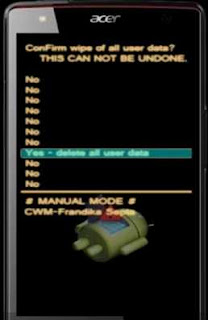
  8. Now, choose "yes--- delete all user data" Press Volume Down to scroll to Recovery option. 
    Hard Reset Acer liquid Z205.
    Hard Reset Acer liquid Z205.
  9. Then press Power Button, to confirm menu and then choose  reboot system now

  10. Hard Reset Acer liquid Z205
    Hard Reset Acer liquid Z205
  11. Follow the screen instruction to continued hard reset your Acer liquid Z205


Thats all, you have done to Hard Reset Acer liquid Z205,

ATTENTION... !!!
Hard Reset/Master reset/Factory Reset may erase all data stored on internal memory and all accoount setting, We  is not responsible for the risks afterward. 
Do it with your own risk

Specifications LG EA93 with 21 9 Aspect Ratio

Specifications LG EA93 with 21:9 Aspect Ratio - LG has recently introduced its latest monitor called Ultra Wide EA93, where the monitor is the first monitor in the world to have an aspect ratio of 21:9.

LG EA93 is using IPS panels to produce quality color as the real world. This monitor features a 4-Split Screen is capable of dividing the display screen into 4 Windows, this feature is designed to maximize productivity.
 LG EA93

LG Ultra Wide Monitor has a 29-inch screen siz e with a resolution of 2560 x 1080 pixels. LG EA93 is also equipped with MHL connections to view content or play games that exist on your smartphone, and the monitor is also equipped with 7W stereo speakers.

Samsung Galaxy S5 Secret Codes New Galaxy S Five Hidden Codes

Samsung Galaxy S5 is the latest and smartest android mobile launched by Korean Giant Samsung having a 5 inch full HD display and running on Android 4.4 kitkat.
Secret Codes helps you to access some internal functions of mobile which are intended for developers and troubleshooting purposes. They are the combination of numeric and Special Characters like * and #. These codes can give you access to the whole new world of hidden menu, diagnostics test and much more.


Secret Codes of Samsung S5


So, here i am going to show you how to access the internal function of Galaxy S5 for testing the various hardware parts of your phone if it is working properly or not with the help of this secret code you can test lcd, vibration, camera, sensor (accelerometer sens or, proximity sensor, magnetic sensor), touch screen, speaker, sub key, etc... if you have any hardware problem with your galaxy S5 you can identify with this code if it is working or not to do this follow the steps below.
First of all open your keypad 


Then dial the secret code *#0*#

Now you get a screen with title LCD TEST and below that you have lots of option to test various hardware parts of your phone such as speaker, sensor, lcd, etc
To go back use right physical button 
While testing the touch you have to touch and mark all the squares back button does not work 


Other use full secret codes for android phone tested on galaxy S5
    • * #1234# to check software version of phone.
    • *#12580*369# to check software and hardware information.
    • *#0228# Battery status (ADC, RSSI reading)
    • *#32489# Service mode
    • *#7780# factory data reset galaxy S5
    • *2767*3855# Full factory reset (Dont dial it does not ask you to confirm unless you have problem)
  • If fa ctory reset codes are not working then Click Here 

    Download Best Motion Sensor games for Andorid


These codes will work on all the models of galaxy series

Senin, 30 Mei 2016

Acer Liquid E1 user guide manual pdf

Acer Liquid E1 user guide manual pdf â€" Acer Liquid E1 was released on March 2013 and also available as Acer Liquid E1 Dual with dual SIM card slot. Acer Liquid E1 appearance looks similar with Google Nexus regarding to round corner and shapes. Acer Liquid E1 is slightly smaller it make it easy to handle and preloaded with AcerCloud service, file manager app and ToDo app.


Acer Liquid E1 user guide manual pdf


Acer Liquid E1 equipped with specifications and key features such as: 132 x 68.5 x 9.9 mm in dimension with 130 g in weight, 4.5 inch IPS LCD capacitive touchscreen display 540 x 960 pixels 16 million colors display and multitouch, microSD up to 32 GB, 4 GB internal storage, 1 GB of RAM, 5 megapixel rear facing camera with autofocus and LED flash, VGA as front facing camera, powered by 1 GHz dual core processor, Android 4.1.1 Jelly Bean operating system, Li-Ion 1760 mAH battery, stand-by time up to 400 hours and talk time up to 8 hours.   

Acer Liquid Z1 rivals and competitors manual:

  • Acer Liquid E2
  • Acer Liquid Z2
  • Samsung Galaxy Grand
  • Samsung Galaxy S Duos
  • Samsung Galaxy SIII Mini

Acer Liquid E1 user guide manual pdf is available to download 8.9 MB size and for Acer Liquid E1 Dual is available to download for 9.5 MB. The user guide manual of Acer Liquid E1 contains of 69 pages for setting and others important information. On Acer Liquid E1 user guide manual you will find AcerCloud set up as preloaded of app for the smartphone. You can set up AcerCloud with Windows 7 or Windows 8 by doing the steps on the user manual.   

Table of contents for Acer Liquid E1 user guide manual pdf:

  • Setting up
  • Using your smartphone
  • Managing contacts
  • Making calls
  • Internet cal ling
  • Messaging
  • Going online
  • AcerCloud set up
  • Using the camera
  • Advanced settings
  • Accessories and tips
  • Appendix
  • End User License Agreement


For owner of Acer Liquid E1, here we give you direct link download of Acer Liquid E1 and Acer Liquid E1 Dual user guide manual pdf from official Acer website below:

Download Acer Liquid E1 user guide manual pdf here


Download Acer Liquid E1 Dual user guide manual pdf here

Guide how to Flash Lenovo S580 to fix Bootloop using CWM Recovery and Flash Tool

Guide how to Flash Lenovo S580 to fix Bootloop using CWM Recovery and Flash Tool.

Flash Or Install Firmware Lenovo S580. When your Android Lenovo S580 device is got bootloop, you can fix your device by performing flash on this device. And now on this guide we will show to you how to flash your Android Lenovo S580 device using Stock Firmware or Flash file. So, why your device got bootloop ? There is not definitive answer to explain it, but generally bootloop on this device occured when already rooted. but it not sure, also on unrooted android device may occured bootloop.

Not only Android system failure caused your device become bootloop, but sometimes it caused by user activity. So, if your are a new Android user you must be carefully to use your Android device. On this guide Guidebelajar will explain to you how to flashing android device on Lenovo S580  with easy and simple step using CWM recovery.

Flashing in android is the same way like fresh install on the windows PC, So by perform a flash on Android you will give a new performance like a new phone. One reason that you should perform a flash your android is because your android get bootloop or when you failed to install Stock ROM Mod.

Lenovo S580 announced in September, 2014, and Released 2014, September, Lenovo S580  Android is a smartphone with a 5,0-inch IPS capacitive touchscreen, 16M colors, works on Android OS, v4.3 (Jelly Bean) system and powered Quad-core 1.2 GHz Cortex-A7 CPU, Qualcomm Snapdragon 200 chipset and Adreno 302 GPU as their engine, and combined with 1 GB RAM, and 8 MP on main camera, and 2 MP on secondary camera.

Prerequisites.

Provide this tool and file before you perform flash on bootloop Android Lenovo S580.

  1. You must download and install USB Driver for Lenovo on your windows computer or PC. Here
  2. Download Stock Firmware (Flash File)for Lenovo S580 Here or Here
  3. Original USB cable for Lenovo S580.
  4. Your Lenovo S580 device must installed CWM recovery, see this guide 

    Method 1#. How to Install CWM Zip file On Lenovo S580 via recovery mode.

    follows this step to install the Firmware on the Lenovo S580 Smartphone ;
    1. Your Lenovo S580 must installed CWM recovery.
    2. Then extract the stock firmware, and you will get the update.zip file.
    3. Now, copy zip file into SD Card.
    4. Then, power off your device, wait for a moment untill your phone really shut down. 
    5. Then, Enter your device into fastboot mode.
    6. Now you should turn it On using this combination key.

      • power button + volume up + volume down
    7. This action will bring you to recovery mode on Lenovo S580,
    8. Once you are in recovery mode, just select the option called :
      • install zip
      • choose zip from /sdcard.
    9. Wait for few seconds to complete the task, 
    10. Once it done, just reboot your device.
    11. Finish

    Method 2#. How to Install or flash Lenovo S580 using flash tool.

    1. To use this second method you must download this tool first ;
    2. Please make sure to unzip this archive. 
    3. Then remove your back case, battery, sim card and SD Card  if installed
    4. Next, Connect your Lenovo S580 to Computer, while holding the power button and volume up. The PC will detect the new hardware, just ignore it. 
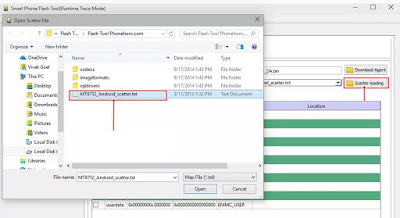
    5. Open SP flash tool software and click scatter load. find Lenovo S580 scatter storage location earlier.
    6. In the Scatter Loading field go to the folder where you extracted the Flash Tool and select target_bin
      Flash / Install Firmware Lenovo S580.
      Flash / Install Firmware Lenovo S580.
    7. Then you click options ->Download -> then check DA DL all with checksum.
      Flash / Install Firmware Lenovo S580.
      Flash / Install Firmware Lenovo S580.
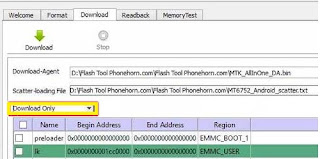
    8. On download tab, ensure you have selected download only option from dropdown menu, see below picture.
      Flash / Install Firmware Lenovo S580.
      Flash / Install Firmware Lenovo S580.
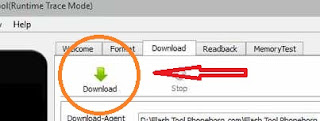
    9. Then, click download button on top right and connect your Lenovo S580 with USB cable in phone switch off position.

      Flash / Install Firmware Lenovo    S580.
      Flash / Install Firmware Lenovo S580.
    10. Process will run automatic, and you can see the red stripe showing download percentage at bellow
    11. When your process complete, you can see a green circle with tick mark. 
      Flash / Install Firmware Lenovo S580.
      Flash / Install Firmware Lenovo S580.
    12. Now disconnect your Lenovo S580
    13. Intall you battery again. 
    14. Then, start your Lenovo S580. (remember, on the first booting it will take a long time to start)
    15. Success. enjoy.

      Huawei Ascend Mate Manual User Guide

      Huawei Ascend Mate User Manual Guide  In the second quarter of 2013, Huawei is likely to flood the market with a line of homeland latest smartphone supported a variety of features. This is evident from the list of telecommunications equipment certification test results SDPPI DG (Postel) that shows the type of smartphone that Huawei has bagged the test results. Among them there are Huawei Ascend Y300, G510 Huawei Ascend, Huawei Ascend Mate and some other types.

      In line with the data Postel, Head of Product M arketing Huawei Indonesia, Legi Lewis also said that next June Huawei Ascend Mate will begin to be marketed in Indonesia. Additionally, Legi Lewis also added that until the fourth quarter 2013, Huawei will deliver 15 targeting smartphone products to the market.

      "Until Q4 our target to 15 products (smartphones)," says Legi Lewis on the sidelines of the opening ceremony of Indonesia ICT Carnival 2013, at Hotel Sultan, Jakarta.

      Huawei Ascend Mate itself is powered smartphone screen 6.1 inch IPS panel 720 × 1280 pixels (~ 241 ppi) and coated with Corning Gorilla Glass. In the viscera sector, Huawei Ascend Mate uses Quad-core 1.5GHz processor plus 2GB of RAM. As for the operating system, relying Mate Ascend Android 4.1 Jelly Bean.
      Download Huawei Ascend Mate Manual User Guide

      3 Feasible Ways to Backup HTC One Phones The Most “Complete” Guide

      Although, HTC One allows you set up a daily backup of all your important information and settings, a great amount of HTC users encounter the trouble that things stored on HTC One accidentally lost without realizing it. According to a report, most of HTC users don̢۪t know how to use the HTC one̢۪s great backup function, and some of them even have no idea to backup their HTC One. To avoid the unnecessary data loss, you̢۪d better backup your HTC One before you erase data from HTC, factory reset your phone or upgrade to a new HTC One M9. Here I conclude 3 easy ways to backup HTC One mobiles.

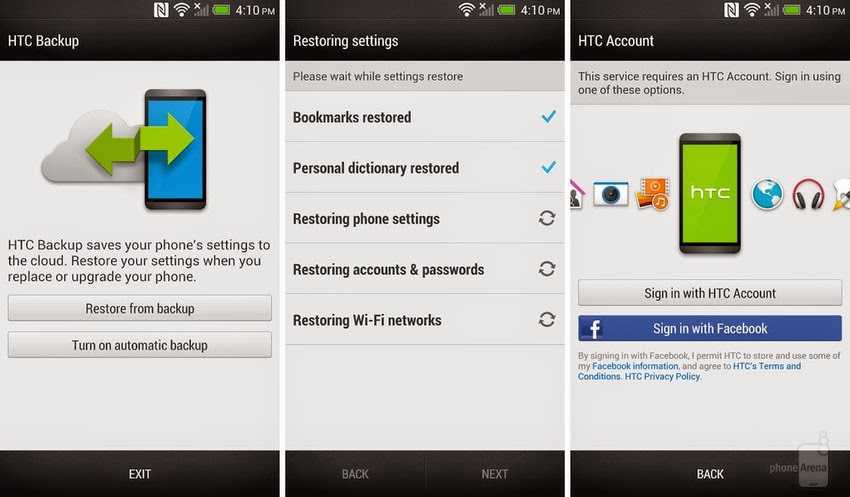
      Option 1. Backup HTC One using HTC Backup


      The in-built HTC Backup uses your free Google drive and Dropbox storage to retain your conten ts and settings. It is capable of backing up and restore home screen setting like categories and headlines from BlinkFeed, wallpaper, widgets and layout of home screen. The other stuffs backed up are the accounts and passwords and apps and settings like contacts, sms, call history, web bookmarkds, personal dictionary, Wi-Fi networks etc.


      Sync with DropBox:
      - Turn off Google Backup and set HTC One to backup daily over-the air.
      - Go to setting -> Backup & Reset ->Tap the Backup On/Off switch(optional)
      - Select the HTC Account and sign in (you can sign in with HTC Account/Facebook)
      - Sign into Dropbox, slect Backup History and the tap button “Back up now”.

      Backup with Google Drive:
      - Open the HTC Backup app and turn on automatic backup to do a daily backup.
      - Make sure Back up phone daily is selected, and then tap Next.
      - Sign in with your Google Account, HTC Account, or Facebook Account.
      -On the Cloud storage screen, hit the Google Drive, then tap “OK”.
      - Sign in to your Google Account to access your Google Drive.
      - Tap “Back up now” to manually back up HTC One anytime.

      Youll see the most recent backup date and time under “Backup history” option. 


      Option 2. Backup HTC One with HTC Sync Manager


      HTC Sync Manager is an useful utility to backup music playlists and files such as  contacts, calendar events, bookmarks etc. from your HTC to your computer. It enables to transfer iPhone data to HTC phone. It is a separate software which should be installed. Also, you can import and copy all music, photos, and videos between your HTC phone with computer.

      -Backup Musics on HTC: Tap “Music” -> Settings, then select “Copy all music from phone”.
      Copy photos and videos: Click “Gallery” -> Setting, then select “Automatically import photos and videos from phone”.
      -After that, you can delete the large media files to free up your phone storage by clicking the Apply button to start the process.

      Note: Account info, settings and other personal content cannot be backed up with HTC sync manager.


      Option 3. Backup HTC One via Android Backup Apps

      As I known, there are many 3-rd party android backup apps available to backup and restore data on HTC One. Here is some of android data backup apps which have a good reputation:


      Jihosoft Android Manager,without needing root.
      Helium (previously known as Carbon), without needing root your HTC (Free / $4.99)
      Titanium Backup, root needed (Free / Pro Price: $6)
      My Backup ,root needed (Free / Pro Price: $5)
      Ultimate Backup,root needed  (Free / Pro Price: $3)

      And more...


      That̢۪s it, if you have other ways to backup HTC One, don̢۪t hesitate to leave comments below.

      You may be interested in : How to Recover Data from HTC One wihout backups

      Tips mengatasi display picture BBM error pada Android

      Tips mengatasi display picture BBM error pada Android.

      BBM kini sudah dapat anda nikmati di perangkat android, sehingga sekarang pengguna BBM sangatlah banyak, setelah perilisan BBM untuk android berlangsung, beberapa hari sangatlah heboh bahkan masuk koran nasional dan website teknologi besar beritanya. Tetapi, fakta di balik hebohnya kehadiran fitur BBM untuk Android ternyata menyimpan sebuah bug yang mungkin bagi sebagian besar orang sangatlah menjengkelkan, yaitu tidak muncul display picture dari BBM Android di user BBM lainnya. Tentu saja hal ini sangatlah menjengkelkan, karena kita sudah menempatkan display picture dari foto yang menurut kita keren atau bagus dan lucu, namun malah orang lain tidak dapat melihatnya karena masalah bug ini. Jadi, yang dapat melihat display picture hanya anda sendiri, dan ini tentu saja di luar yang kita kehendaki. Tetapi, anda jangan mudah menyerah, karena jika anda mau melakukan trik dan mengutak ngatik, anda akan mengetahui cara untuk memperbaiki bug ini, dan cara supaya display picture BBM untuk Android ini bisa muncul dilihat oleh BBM temanmu semua. Oke langsung saja, berikut trik mengatasi display BBM Error di Android.

      Tips mengatasi display picture BBM error padaAndroid.


      display picture BBM error pada Android
      display picture BBM error pada Android

      • Apabila display picture BBM Androidmu tidak muncul gambarnya jika dilihat dari BBM temanmu, maka kemungkinan pinmu tersuspend karena sebelumnya pernah mencoba mendownload versi yang belum dirilis resmi, jadi triknya anda harus membuat id baru di website resmi Blackberry id.
      • Apabila Anda sudah mendaftar kemudian un-install terlebih dahulu BBM yang sudah anda install sebelumnya kemudian masuk seperti saat pertama dulu anda lakukan.
      • Apabila anda sudah berhasil masuk aplikasi BBM, dan juga berhasil saat pertama kali anda kemudian akan diminta menginput negara dan tanggal lahir, anda ikuti saja apa yang diperintahkan.
      • Setelah itu, ini merupakan langkah yang penting dan harus anda perhatikan, apabila anda sudah berhasil melewati langkah k e 3, kini anda akan mendapatkan nomor pin baru, di mana di atasnya ada gambar kosong, anda langsung saja isikan gambar kosong tersebut dengan foto anda sendiri. Berikut contoh screenshootnya;
        display picture BBM error pada Android
        display picture BBM error pada Android
      • Jika sudah selesai, anda kemudian dapat menginvite lagi semua teman and a sebelumnya, nanti display picture anda akan muncul. Trik ini seharusnya bekerja dan berfungsi maksimal, anda mungkin dapat menanyakan kepada temanmu perihal apakah trik benar-benar berhasil atau tidak, dengan minta tolong kepada temanmu untuk melihat apakah display picturemu di tampilan BBM teman sudah berubah atau belum, jika sudah berubah berarti sudah berhasil.
      • Apabila display picture BBM anda masih tetap tidak muncul, berarti sudah ada bug dari originalnya, sehingga anda tidak bisa melakukan apa-apa kecuali menunggu update versi terbaru aplikasi BBM untuk Androidnya.

      Bagi anda pengguna BBM untuk Android smartphone Andromax, dan mengalami masalah serupa, anda bisa mencoba trik ini. Masuk menu setting di smartphone Android anda, kemudian carilah menu developer options dan bukalah, setelah itu carilah menu force GPU rendering, hilangkan centangnya. Namun, beberapa user berkata bahwa masalah ini juga bisa terjadi pada smartphone selain Andromax, cara nya sama untuk penyelesaian masalah baik di smartphone Sony, Samsung, Lenovo, HTC bahkan Android besutan developer lokal juga. Untuk membantu melihat caranya, anda bisa melihat di gambar ke 3 yang saya tampilkan di atas, semoga bermanfaat.


      Demikian artikel tentang Tips mengatasi display picture BBM error pada Android.


      Guide To Upgrade or Flash Sony Xperia E3 Dual D2212 Using XperiFirm And Flashtool

      Guide To Upgrade or Flash Sony Xperia E3 Dual D2212 Using XperiFirm And Flashtool.

      Flash Sony Xperia E3 Dual D2212 Using Flahtool.  Now you can get all latest update of All Sony Xperia series to upgrade your firmware, If your Android devices is using older android version like Android 4.0 Kitkat, and you devices is supported for upgrade you will be automatically get notification directly to your devices. But it is depending on some region and country where you live. But if you want to upgrade manually to your device, you can use this method.


      Sony Xperia E3 Dual D2212 comes with IPS capacitive touchscreen, 16M colors, LCD 4,5 Inches, Android OS, v4.4.2 (KitKat), and supported with Qualcomm MSM8226-2 Snapdragon 400 chipset, Quad-core 1.2 GHz Cortex-A7 CPU, GPU Adreno 305, combined with 1 GB of RAM as their  engine. And you can enjoy exciting 5 MP on main camera, and VGA on secondary camera to capture your best moments on your life.

      Flash Sony Xperia E3 Dual D2212 Using Flahtool
      Flash Sony Xperia E3 Dual D2212 Using Flahtool


      The other reason why you should perform a flash to your android, is because your android get bootloop or when you failed to install Stock ROM Mod. At this reason We  will share a guide how to perform flash on Sony Xperia E3 Dual D2212  with the simple and easy way.

      Maybe you ask what is bootloop, Ok.. now I will explain to you what si bootloop. Some people say that bootloop is a problem that occured on an android system which the android system could not start up going to the homescreen menu. And its happened is automatically return to the initial state on the first time when you turn on the Sony Xperia E3 Dual D2212 . And the device will stop to display on the smartphone logo.

      How To Install Android Lollipop On Xperia Using XperiFirm and Flashtool.


      Read this guide very carefully before you continue attempting to install or flash a new firmware to your Sony Xperia E3 Dual D2212. Guidebelajar does not responsible to your device if something go wrong, Do it with your own risk. To attempting flash or install a new firmware to your device you do not need to unlock bootloader and root your devices. And your warranty will not be voided if you flash or install a new firmware to your Sony Xperia E3 Dual D2212  devices.

      Fir st Step Before Attempting Flash Sony Xperia.

      Because we use this method to flash your Sony Xperia device, it will take a big risk to your device from fail, damage or wrong. So, to minimize our flashing process from any fail and something bad during flash or install firmware process, please read first guide before attempting flash or install Sony Xperia devices.
      • Make sure you have enough battery capacity in your device, it’s recommended you have 80% of battery capacity
      • Backup all important stored data in internal memory. (video, document, music, etc) because flashing process will erase all data that stored in this devices. Guide to backup your data can you read here:
      • It is very recommended that you create a backup of your original firmware, just in case you need to get back for repair your device if something goes wrong.
      • Download and Install drivers for your Xperia devices,  Yo u need to ensure that your computer has all  of the necessary drivers installed for your Sony Xperia E3 Dual D2212 . 
      • For The best way to do this is to install  PC Companion.
      • Make sure you connect your Xperia devices to the computer before starting the process to download the necessary USB and ADB drivers. 
      • If you have any problems you will  find the necessary drivers (once you have installed Flashtool ) in the following folder location:  Ã¢€˜C: Flashtool drivers’.

      Download Sony Xperia Firmware Automatically Using Xperifirm.


      The next step you should do is download a new firmware in accordance with your Sony Xperia model and version, You can follow my special guide to do this here.

      Using Flashtool To Upgrade / Flash Xperia Firmware.

      This guide is show to you how to using flash tool step by step to flash or install firmware to your Sony Xperia E3 Dual D2212 devices. Follow this guide carefully to get the perfect result .
      1. Fisrt step you must download and install the latest flash tool from here.
      2. When finished download, now you must install this flash tool on your PC.
      3. If you using windows 8 or windows 8.1 you must follow additional guide to insall flash tool
        • Click Start > Run
        • On the dialogue box appear you can ty pe : shutdown.exe /r/o/f/t00
        • Now make the following selections to boot into the Start Up Setting screen : troubleshoot > Advances options > Start Up settings > restart.
        • When your windows 8/8.1 restart, select number 7 i.e . “Disable driver signature enforcement”
        • Now your windows 8/8.1 will start with Disable driver signature enforcement disabled until the next reboot.
        • Ok, flashtool driver now can be installed here
        • And windows 8/8.1 will warn that the driver is not signed and will require you to confirm the installation
        • Once your flashtool complete installed, you must reboot or restart your windows 8/8.1
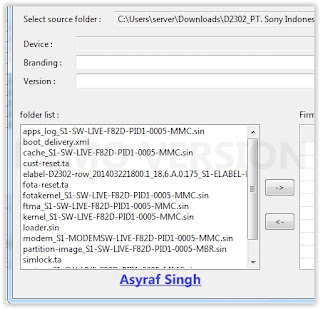
      4. After you finished installed flashtool, now launch this program window, and if flashtool successfully opened you should see windows like picture shown below.
      5. Then navigate to tools > bundles > create.

        flash tool sony xperia
        flash tool sony xperia
      6. Now you must choose the folder where you save your firmware files, you can click the button show on picture below.
        flash tool sony xperia bundler
        flash tool sony xperia bundler
      7. Then click OK (this image below is for an example, this use D2302)
        firmware sony xperia - flashtool xperia
        firmware sony xperia - flashtool xperia
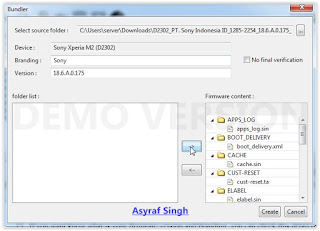
      8. On picture show phone model (for an example is D2302). And the bundler now include all of the Sony Xperia E3 Dual D2212 firmware files.
        phone model - flashtool xperia
        phone model - flashtool xperia
      9. Now, you must select your device by double click on device form to get list of device
        device selector - flashtool xperia
        device selector - flashtool xperia
      10. For this guide We use Sony Xperia E3 Dual D2212, with ID  D2212
        device selector - flashtool xperia
        device selector - flashtool xperia
      11. Now, you can double click again on name of your device to select variant on variant selector.
        variant selector - flashtool xperia
        variant selector - flashtool xperia
      12. Now you must input branding and firmware version number into the appropriate form.
      13. If you want know what is your firmware version and branding, you can check this detail on the actual firmware you downloaded before.This picture is an example for Sony Xperia M2, If you use another version may be different.
        xperia firmware file name - flashtool
        xperia firmware file name - flashtool

      14. Highligt all file listed on folder list (use ctrl + click), and move to the right of windows. Then click create button. This picture is an example for Sony Xperia M2, If you use another version may be different
        highlight firmware file - flashtool sony xperia
        highlight firmware file - flashtool sony xperia
      15. And now wait the process. Flashtool will start creating FTF firmware file, a progress bar will shown at below.
        creating FTF firmware file - flashtool sony xperia
        creating FTF firmware file - flashtool sony xperia
      16. When your FTF firmware file nhas been complied, you will see the message, bundle creation finished.
        bundle creation finished - flashtool sony xperia
        bundle creation finished - flashtool sony xperia
      17. Make sure your FTF firmware file has been created, to check it you can go to your folder location on your computer.
        • C;usersyour PC name.flashtoolfirmware
      18. And you should see folder like this.
        FTF firmware - flashtool xperia
        FTF firmware - flashtool xperia
      19. To start flash your Sony Xperia E3 Dual D2212  device, click the lightning bolt in the top left of flashtool windows.
        sta   rt flash sony xperia device
        start flash sony xperia device
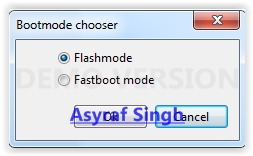
      20. Select flashmode on the bootmode chooser, then click OK.
        bootmode chooser flashtool xperia
        bootmode chooser flashtool xperia
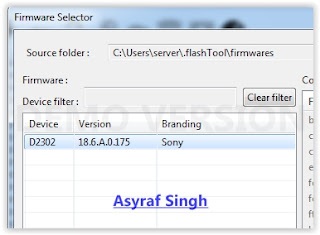
      21. Now select the firmware build version that you want to flash from the fiirmware pane windows. Then click flash button on left bottom. This picture below is an example for Sony Xperia M2,  If you use another version may be different. 
        firmware selector flashtool sony xperia
        firmware selector flashtool sony xperia
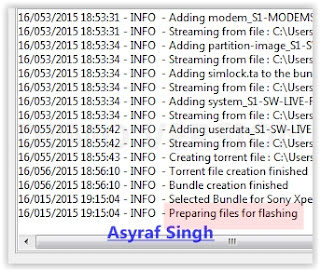
      22. And you will see this message on flashtool,  preparing files for flashing.
         preparing files for flashing - flashtool sony xperia
         preparing files for flashing - flashtool sony xpe ria
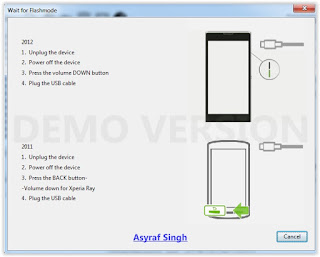
      23. It will take around 60 seconds for the pop-up window appear. And now its time for you to connect your Sony Xperia E3 Dual D2212  device.
        wait for flashmode - flashtool sony xperia
        wait for flashmode - flashtool sony xperia
      24. Make sure your Sony Xperi a E3 Dual D2212  devices is power off.
      25. Then, Hold the "Volume down" button whilst connecting USB cable.
      26. Once the Pop Up windows disappears and flashing process has started, now you can release the volume down button.
      27. For an older sony xperia device, replace voleme down with back button (xperia ray)
      28. When the flashing process is finished, you can see message on flashtool
        • Flashing finished
        • Please unplug and start your phone.

      Minggu, 29 Mei 2016

      How to flash Lenovo A536S stock ROM

      How to flash Lenovo A536S stock ROM with SP flash tool


      Step 1: Download the Stock Rom  and extract it on your Computer.


      Step 2: Download  Smart Phone Flash Tool on Your computer and extract it.


      Step 3: Open Flash_tool.exe .


      Step 4: Click on the Scatter-Loading Button from the Right.


      Step 5: Now, Locate the Scatter File, you will find this file in stock ROM folder.


      Step 6: Now, Click on the Download Bu tton to begin the Flashing Process.


      Step 7: Connect your Smartphone to the Computer using USB Cable. After connecting the device to the computer Press Volume Down or Volume Up key, so that your computer easily detect your phone.

       Step 8:  Now flashing process will start in the bottom in yellow color.

      Step 9: Once Flashing is completed, a Green Ring will appear.


      Step 10: Unplug USB cable from your smartphone, and swith ON your phone.

      Flashing Successful


      Downloads:

                                   SP Flash Tool


      Best LG Phones from Tracfone

      Top 8 LG Brand Phones From Tracfone

      lg best tracfone cell phone prepaid
      The Best LG Brand Cell Phones
      Here are the top 8 phones made by LG for Tracfone prepaid cell phone service. Tracfone is a prepaid wireless service provider that offers inexpensive cell phone plans, and also devices to use on those plans.

      Each of the phones below offers certain features and benefits the others may not be able to offer, so it is important to analyze which phone may be right for you. Some of the phones are older devices but there ar e some new Android smartphones included in the list as well.

      These are a wide variety of LG brand phones available with Tracfone, for those who like the LG brand and want to narrow their search to one brand. If you prefer other brands of cell phone, you may find our useful.
      Cell Phone Reviews page

      LG is a very popular electronics company that makes everything from TVs to refrigerators. They make some of the most cutting edge smartphones as well.

      The LG cell phones offered through Tracfone are not always newest or most recently released. They tend to be older models that have proven themselves with good value, durability and low cost. In this list you will see a range of phones, from flip phones to smartphones, and each one has its uses. We are rating these phones based on functionality, features and which one we would want to own.

      LG products are great, and the same is true for their mobile devices from Tracfone, so lets get straight to the top 5 LG phones from Tracfone.

      The Top 5 Best LG Brand Cell Phones Available at Tracfone

      Starting with #8:

      #8 - LG 440G
      best LG cell phone tracfone
      LG 440G
      The LG 440G is a flip phone loaded with more features than one would expect for this compact phone.

      It comes with fast mobile web, courtesy of 3G connectivity speeds. It also has a decent 1.3 MP camera, hands free speaker, voic e dialing and all the other features normally included with a Tracfone. The only downside to this impressive little phone is that it only comes with Double Minutes for Life instead of the better Triple Minutes for Life that most newer Tracfones now have.

      Overall, this LG phone is small, convenient and has great value as a backup phone, or for other uses. You can read TracfoneReivewers full LG 440G Review to learn more, including how to find it for less than retail price.

      #7 - LG 530G
      top 3 lg tracfone cell phones
      LG 530G
      This LG phone is modest upgrade from older phones, including the LG 500G, which it is similar to. The LG 530G is a candy bar style phone (meaning no flipping or sliding parts), with a full QWERTY keyboard.

      This phone is great for texting, in fact, it is one of TracfoneReviewers top picks in our Best Tracfone Cell Phones for Texting post. The QWERTY keyboard makes texting quick and convenient, even for those unfamiliar with this style keyboard. If you havent tried texting with a phone like this, it is well worth a try.

      Other impressive features the LG 530 comes with include MP3 player, 1.3 MP camera, and best of all, Triple Minutes for Life. (which triples every minute added to the phone - a great value)

      Overall, the LG 530G is a good LG brand cell phone offered by Tracfone and works well as an everyday phone. Triple Minutes for Li fe and easy texting makes it one of the best cell phones offered by Tracfone.

      You can read our Review of the LG 530G to see the full feature list, and find our likes and dislikes for the phone.

      #6 - LG 840G
      lg 840G best tracfone cell phone
      White LG 840G
      Our #6 pick for best LG Tracfone is the 840G. It has semi-modern features, and provides great value and functionality to consumers. It comes with Triple Minute s for Life, which means that every minute you add is tripled!

      Three features that really stand out on the LG 840G are Touchscreen, MP3 player with 2GB MicroSD card included, and WiFi connectivity.

      The LG 840G is one of only a handful of Tracfone Cell Phones with WiFi.(besides smartphones) WiFi connectivity allows you to connect to the internet for free and surf the web without using prepaid minutes. Needless to say, WiFi is a huge feature.

      The touchscreen on the LG 840G is better than the touchscreen on the older, LG 800G. It may take some getting used to, but functions well and helps make this phone look like it is part of the modern smartphones, even if it isnt quite there yet.

      Overall, the LG 840G is more stylish than older phones, but lacks when compared to the smartphones available. You can read our entire Review of the LG 840G to see all the features, and where to find it for less than the $50 retail price.

      #5 - LG Optimus Dynamic
      best LG phones from tracfone
      LG Optimus Dynamic
      One of the first phones with Android to be available for Tracfone, the LG Optimus Dynamic was the start of a wave of smartphones that washed in over the last few years. This phone is a true smartphone, running Android 2.3 and comes with a lot of features besides the ability to access thousands of apps in the Google Play store.

      The touchscreen is 3.2", about the same as the LG 840 G. The Dynamic also has WiFi, and Triple Minutes for Life.

      It has a convenient size for those who dont want a large phone, and you can easily surf the web, browse YouTube, or play games on the phone. The storage space on the Optimus Dynamic isnt great, however, so you wont be able to load a large number of apps. But there are ways to move apps to the included SD card which helps increase the space.

      Check out our full review of the LG Optimus Dynamic to learn more about the features. You can also take a look at the price on Amazon, which last check put it at under $20!

      While this is a smartphone, it also is a very basic one, and has almost no memory for storing apps or other files, and generally may not be the best choice for most people looking for a smartphone to use with Tracfone.

      #4 - LG Optimus Dynamic II
      top 5 lg tracfone devices
      LG Optimus Dynamic II
      As you can probably guess, the LG Optimus Dynamic II is a newer and better upgrade to the LG Optimus Dynamic. The Dynamic II has a larger 3.8" screen, WiFi, and more internal memory for storing things.

      The LG Optimus Dynamic II runs Android 4.1 which is a newer version of Android OS. It also has a 3MP camera and lots of other great features.

      The Dynamic II was a vast improvement over other smartphones available from Tracfone at the time. However, we continue to see better phones becoming available. Take a loo k at our List of Android Smartphones to see some of the other options available including the LG Optimus Fuel which we would rate similarly to the Optimus Dynamic II.

      For more features and info, read our Review of the LG Optimus Dynamic II. It is currently selling for under $50 on Amazon and other places.

      #3 - LG Lucky and LG Sunrise
      The LG Lucky (L16C) and LG Sunrise (L15G) are basically the same device, but one for use with GSM networks, and the other for CDMA (note the G and C at the end of each phones name). 

      These phones are recently released and come with Android 4.4, a 3.8" touchscreen for those who want a smaller sized device, and also an improved amount of processing power and RAM compared to older smartphones. 

      Read our Review of the LG Lucky for more details on this phone, and where you can find it.

      While the Sunrise and Lucky are adequate devices, we would rather go with one of the next two choices:

      #2 - LG Ultimate 2
      best tracfone lg phone
      LG Ultimate 2
      The LG Ultimate 2 was like a breath of fresh air when it was released on Tracfone and saw a large number of users upgrading to it from older devices for good reason.

      The Ultimate 2 comes with a 4.5" touchscreen, Android 4.4, a dual core processor and 1 GB of RAM. One of the most important features this phone also includes is about 4GB of useable internal memory for applications and other storage. Up until this point, Tracfones smartphone offerings had very little internal memory, limiting their usefulness.

      While the Ultimate 2 isnt quite as good as other mid level smartphones like the Moto G or LG G2, it is priced at a more reasonable level. In fact, you can find the LG Ultimate 2 on Amazon for just $70 last time we checked, and about the same on eBay.

      Dont forget to see our full Review of the LG Ultimate 2 for further details on this phone, and lots of comments from users.

      We ranked the Ultimate 2 in second on this list because it delivers fairly well in many categories, but our top choice has just a few additional features as you will see.

      #1 - LG Power and LG Sunset
      top lg phones
      LG Power
      These are some of the latest phones to come to Tracfone and our current pick for the best LG phone! The Power (L22C) and Sunset (L33L) are very similar except for one important detail which we will cover further down.

      Both phones feature a 4.5" touchscreen, Android 5.0, 1 GB RAM with a quad core processor for better performance compared to older smartphones. They also have a 5MP camera, and about 4 GB usable internal memory.

      Now, the difference between these devices is that the LG Power uses 3G CDMA cell service, while the LG Sunset is capable of 4G LTE on GSM networks. Obviously, if you have access to GSM networks in your area you will want the Sunset over the Power, but not all areas have coverage.

      Take a look at our reviews for the LG Power and LG Sunset to learn more about each device, and see where you can find them for the best prices.

      If youre just looking for help in choosing a new smartphone, we would recommend either the LG Ultimate 2, or the LG Power/Sunset. You should go on the Tracfone website and check if you have service in your area first (you can type in your zip code when searching for cell phones, and if CDMA smartphones show up, you will have service for CDMA, and the same for GSM) then look around online, both eBay and Amazon and other retailers, and find the best deal. Prices change often, and you can also find the phones bundled with Airtime cards for an even better deal.

      -----------

      This concludes TracfoneReviewers selection of the best LG phones offere d by Tracfone. We hope you found this useful. You may be interested in reading our recent post with the Latest Summer Deals and Sales on Tracfone Devices and Minutes.

      And if youre shopping for a new phone, you may want to learn about the new Bring Your Own Phone to Tracfone program that we cover on our Tracfone BYOP page. This program allows you to bring a wide variety of smartphones to use with Tracfone, including some of the most advanced phones on the market like the iPhone 6 and more.

      Leave a comment with your thoughts, questions or ideas and be sure to share this with others who might be interested!

      Dont know what Tracfone Promo Codes are? Well, you are missing out on free minutes!

      Also, be sure to follow us on Facebook for the latest posts and updates! Thanks for visiting!

      This post was originally published on 7/2/2013 and fully updated on 7/30/2014, and again on 8/19/2015.