Kamis, 02 Juni 2016

Tutorial Cara Root LG Optimus G Pro E988 Pada Android 4 4 2 KitKat

[Tutorial] Cara Root LG Optimus G Pro E988 Pada Android 4.4.2 KitKat.

Kali ini kita akan mencoba mengutak-atik atau istilah kerenya adalah melakukan root pada LG Optimus G Pro E988. Sekedar informasi saja bahwa jika anda melakukan root maka anda akan bertindak selaku superuser, sehingga anda dapat melakukan beberapa hal yang belum bisa dilakukan saat belum dalam keadaan root. Smartphone Android keluaran produsen asal korea LG yaitu LG Optimus G PRO E988 merupakan smartphone dengan layar LCD 5,5 inci bekerja pada sistem android 4.1.2 Jelly Bean dan prosessor Quad Core dengan kecepatan 1,7 Ghz dengan chipset Qualcomm MSM7225A Snapdragon sebagai mesinya, serta dikombinasikan dengan RAM 2 GB, dan Internal Memory 16 GB yang dilengkapi juga slot memory upgradable sampai 64 GB, di dukung juga dengan kamera 2,1 MP
Dengan melakukan rooting pada perangkat android maka anda telah membuat Sistem Operasi Android Anda mempunyai hak akses root. Root merupakan suatu user yang mempunyai izin atau permisi untuk melakukan manipulasi file yang lebih banyak dan bebas daripada user biasa. Jika Anda pernah menggunakan sistem operasi komputer berbasis linux tentunya Anda pasti akan menemui satu user root (super user) yang bertindak sebagai ‘Administrator’ dari sistem tersebut.

Pada Setting default, Sistem Operasi Android yang ada di smartphone pada umumnya tidak mempunyai user sebagai root, karena vendor-vendor smartphone memang tidak menyarankan untuk melakukan rooting pada produk smartphone. Adapun keuntunganya adalah sebagai berikut ;
  1. Bisa menghapus aplikasi yang di-install di memori internal.
  2. Bisa menggunakan siste m operasi yang dapat dikustomisasi. (Flash Custom ROM)
  3. Bisa mengubah konfigurasi manual hardware pada smartphone Android Anda.
  4. Lebih fleksibel dan leluasa dalam pengaturan penyimpanan data di memori. (dengan melakukan UnInstall Built In Aplikasi).
    Root LG Optimus G Pro E988 Kitkat
    Root LG Optimus G Pro E988
< div>Sekarang LG Optimus G Pro (E980) sudah dapat menerima Update resmi Android 4.4.2 KitKat melalui OTA. Jika Anda belum memperbarui Optimus G Pro untuk KitKat, Anda secara manual dapat melakukan sendiri dengan cara msuk ke Settings> General> About> Software Update. Dan, jika Anda telah menerima update baru, Anda mungkin akan mencari cara untuk root perangkat tersebut.

Kelebihan LG Optimus G PRO E988

  1. Sudah mendukung jaringan 4G LTE, dimana bekerja pada jaringan 3G HSDPA
  2. Sudah menggunakan layar sentuh kapasitif IPS Plus HD
  3. Layar LCD mempunyai resolusi yang tinggi yaitu 1080 x 1920 piksel dengan kerapatan piksel 401 ppi
  4. Memiliki fitur Wifi Hotspot
  5. Memiliki fitur NFC

Kekurangan LG Optimus G PRO E988

  1. Dari segudang kelebihan yang dimi liki smartphone type ini, hampir dikatakan hanya sedikit kekurangan yang dimilikinya yaitu dari segi fisik yang tergolong besar yaitu 150.2 x 76.1 x 9.4 mm, sehingga total bobot 178 gram.

Persiapan Root LG Optimus G PRO E988.

  1. Jika anda telah berhasil Update Lg Optimus G Pro ke versi Kitkat, maka anda dapat melanjutkan tutorial ini.
  2. Langkah berikutnya adalah memeriksa nomor model telepon Anda dengan cara, masuk ke Settings â†' About Device â†' Model Number
  3. Berikutnya silahkan anda download dan install driver USB LG Optimus G Pro E988 untuk Windows

  4. Sambungkan smartphone LG G Pro E988 Anda ke komputer dengan menggunakan kabel USB untuk menyelesaikan proses instalasi driver. Jika driver sudah terinstall anda dapat melewatkan langkah ini.
  5. Berikutnya mengaktifkan opsi USB debugging pada ponsel Anda. jika anda belum tahu caranya silahkan baca disini
  6. Kemudian pastikan baterai smartphone Anda terisi tidak kurang dari 70%.
  7. Lakukan backup semua data penting Anda sehingga nanti Anda dapat mengembalikan / restore data tersebut setelah selesai proses rooting.
  8. Download one-click root toolkit untuk LG Optimus G Pro E988

Langkah Root LG Optimus G PRO E988.

  1. Silahkan anda ekstrak file roottool.kitkat.zip yang Anda download sebelumnya.
  2. Hubungkan telepon Anda ke komputer melalui kabel USB.
  3. Berikutnya anda jalankan file batch yang bernama StartRoot.bat.

  4. Ketika Commond Window muncul, cukup tekan tombol apa saja pada keyboard Anda.
  5. Telepon Anda akan reboot ke mode recovery.
  6. Saat masuk ke recovery mode, highlight option sideload menggunakan tombol volume dan pilih dengan menekan tombol Power.
  7. Kemudian pilih opsi install from zip> install zip untuk flash paket root.zip dari sideload.
  8. Ketika instala si selesai, kembali ke menu utama dalam recovery dan reboot perangkat Anda.
  9. Untuk memastikan smartphone LG Optimus G Pro E988 anda berhasil di root Anda dapat men-download aplikasi Chainfire dari Google Play Store.
Selesai, LG Optimus G Pro yang menjalankan firmware Android 4.4.2 KitKat telah berhasil di root. Untuk memverifikasi akses root, Anda dapat menginstal aplikasi yang membutuhkan root dan menjalankannya.

PERHATIAN : Terdapat risiko untuk root ponsel android. Jika Anda tidak mengikuti prosedur dengan benar atau melakukan sesuatu yang salah maka dapat merusak ponsel. Untuk itu saya tidak akan bertanggung jawab. Jadi, ikuti prosedur yang diberikan di bawah risiko Anda sendiri.

HTC Desire U Among Intermediate ICS Mobile Has Comes with a price of USD 275

Rumored that HTC as one of the mobile phone and gadget manufacturers are now trying to compete by presenting a number of tools aimed at the middle to lower back where the HTC released a phone to the ranks of the HTC Desire U which this phone design and has nearly the same HTC Desire with C.

As we all know that mobile phones are the HTC Desire U or re-generation of HTC Desire C but a fresh design and appearance of inter-face is even newer HTC sense coupled with Beat Audio feature for music player in it.

Specifications of the HTC Desire U, among others, is to have a 4 inch screen with a resolution of 480 x 800 pixels, running the operating system Android 4.0 Ice Cream Sandwich (ICS), do not miss the pinned-capable 5 megapixel resolution camera coupled with auto focus and LED fl ash camera this is on the back of the phone.
Google Images
HTC Desire U is supported by 512 MB RAM and internal storage of 4 GB MicroSD card slot, there is also additional storage capacity as a facility for the user. In addition it is also equipped with microUSB 2.0 port that serves as the charging and data transfer. For the siz e of the handset is measuring 118.5 x 62.3 x 9.32 mm and weighing 119 grams, of course, the phone is equipped with a battery that has a capacity of 1650 mAh.

Regarding the price of this phone is priced at USD 275. Currently presenting the new HTC phones in the Chinese market and is available in two colors namely White and Black. Are you interested in laneways have a cell phone with affordable price, but pinned with Premium feature specifications of HTC.

HTC Desire U user manual guide pdf is not yet available, please wait for mobile will be released

HTC One XL User Manual Guide

HTC One XL User Manual Guide Pdf - One variant of the One flagship HTC is HTC One XL. Previously we had to peel sophistication HTC X in previous posts well now the next variant is One XL. So whats the difference?

HTC understand very well that consumers need the name variations despite the fact there are hardly any differences in terms of abilities. Different names different impression

XL name synonymous with one of the GSM operators from Indonesia but there really is not any relationship between them. L here is LTE (Long Term Evolution) or 4G network we used to call it. Yes only the difference, See specifications below:

HTC One XL:

  • Quad-band GSM, dual-band 3G support, LTE 1800/2600 4G support
  • 21 Mbps HSDPA and 5.76 Mbps HSUPA
  • 4.7 "16M-color Super LCD 2 capacitive touchscreen of HD resolution (720 x 1280 pixels); Gorilla glass
  • Android 4.0.3 Ice Cream Sandwich with HTC Sense 4.0 latest
  • 1.5 GHz quad-core Cortex-A9 CPUs, low-power companion core, 2 ULP GeForce GPU, NVIDIA Tegra 3 chipset
  • 1 GB of RAM and 32 GB of storage
  • 8 MP autofocus camera with LED flash; face detection and geotagging
  • 1080p and 720p video recording @ 30fps with stereo sound
  • 720p front-facing camera for video-chat
  • Wi-Fi b / g / n and DLNA
  • GPS with A-GPS
  • Stereo FM radio with RDS
  • Accelerometer, proximity sensor and an auto-brightness sensor
  • Standard 3.5 mm audio jack
  • microUSB port (charging) and stereo Blue tooth v4.0
  • MHL TV-out (requires MHL-to-HDMI adapter)
  • Smart dialing, voice dialing
  • DivX / XviD video support
  • HTC Locations app
  • HTCSense.com integration
  • HTC Portable Hotspot
  • Office document editor
  • Beats audio enhancements

Percis all the same features, just the ability of the network only difference, but also because of his ability was almost certain variants One XL will not be sold to the Indonesian market officially, (illegally if possible a lot).
Download HTC One XL User Manual Guide Pdf

Micromax Canvas Nitro A311 Android Pc Suite and Usb Driver for Windows

Micromax Canvas Nitro A311 Android Pc Suite and Usb Driver for Windows

Could you look for in a mobile Usb drivers, here provides a Usb driver free download and how to install to Micromax Canvas Nitro A311 Android. Make sure you have the appropriate type of model phone before downloading the driver to the computer. Driver Usb support following type model for Micromax Canvas Nitro A311 Android Usb Driver, Modem, Com port. Without delay, please download the following. Download Micromax Canvas Nitro A311 Android Pc Suite and Usb Driver for Windows here

Micromax Canvas Nitro A311 Android Pc Suite and Usb Driver for Windows

Micromax Canvas Nitro A311 Android Pc Suite and Usb Driver Installation Tutorial :

  • You should know that if  Micromax Canvas Nitro A311 Android smartphone is powered by a corresponding MTK processor, here is explained how to install the Usb drivers for the model of this type.
  • Run and use as an administrator if you are Micromax Canvas Nitro A311 Android Usb drivers work very precisely and correctly.

Feel free to skip this step if the mobile device is not supported by Mtk Cpu :

  1. Enable USB debugging on Micromax Canvas Nitro A311 Android to do that, please go to Set tings> Developer Options.
  2. Download the driver to the computers usb driver Extract files using WinZip or WinRAR, find the file "PdaNetA4150.exe" and start note (Be sure to close all programs). 
  3. Select the Type phone model (Micromax Canvas Nitro A311 Android Smartphone), Please select press / click the install button.
  4. Now you just connect Micromax Canvas Nitro A311 Android, there will be a popup message saying your phone is connected. Congratulations you have completed the installation.
Well, thats a brief explanation neighbor how to download and step by step how to install Micromax Canvas Nitro A311 Android Pc Suite and Usb Driver for Windows, and uses his good luck.

Best way to Transfer Data Contacts from iPhone 4 4S to Samsung S6 Edge

Part 1: Samsung Galaxy News
Part 2: Best way to Transfer Data Contacts from iPhone 4/4S to Samsung S6/Edge
Part 3: More related articles 


------------------------------------------------------------------------------------------------------------------------------------------------------------


Samsung Galaxy News

Samsung S5 Neo opened in the Czech

June 27, according to foreign media reports Samsung Galaxy S5 Neo has been opened in the Czech Republic some retailers pre-order, priced at $ 490, equivalent to 2980 yuan, will begin shipping on July 3.
(How to Transfer Data from iPhone to Samsung Galaxy S6)


Samsung S5 Neo (SM-G903F) using 5.1 inches 1080p Super AMOLED screen, built-in 2GB RAM + 16GB ROM memory combination, rear 16 million pixel camera, equipped with 2800 mA battery, running Android 5.1 system.


It is worth noting that the aircraft will be equipped with the new eight-c ore Exynos 7580 processor, which has eight Cortex-A53 core, clocked at 1.6GHz, and built-Mali-T720 GPU. However, allegedly equipped than the Samsung S5 Exyons 5422 eight-core processor and Xiaolong 801 processor, performance weakened.

------------------------------------------------------------------------------------------------------------------------------------------------------------


Best way to Transfer iPhone 4/4S data contacts to s6 edge

You may think it is difficult to transfer data contacts from iPhone 4/4S to Samsung Galaxy S6/S6 Edge phone,because iPhone and Android phone are running with different operating systems. But there are a great number of users wish to make a switch between the two kinds of phones since iOS and Android are two of the most popular OSes in the world. How to keep all the files stored on the old phone to the new phone after changing from an iPhone 4/4S to S6/edge? You can look no further than this article, which is going to show you how to transfer data contacts from iPhone 4/4s to Samsung s6/s6 edge with 1 click .

The simplest solution to perform the data transfer from iPhone to android samsung, or from Android to iPhone is to ask help from some third-party tools. Here comes the most well-reviewed iPhone to Samsung transfer tool named - Mobile Phone Transfer, which has the powerful ability to easily and quickly transfer all contacts, text messages, photos, videos, music, call history, apps and more from iPhone 6, iPhone 6 Plus, iPhone 5S/5C, iPhone 4S to Android Samsung galaxy s6/s6 edge.

Still have doubt about this transferring program? It doesnt matter! You can download the free trial version before purchasing it and read the step by step guide in the next paragraph to have more understanding.


Transfer Data Contacts from iPhone 4/4s to Samsung S6/S6 edge in 3 Steps:

Step 1. Launch the Mobile Phone Transfer program

First of all, install and run the program on your computer, then, the main window of the program will show on the screen. What you need is to choose "Phone to Phone Transfer" mode to continue.


Step 2. Link your iPhone and Samsung to the transfer program

Next, you should use two USB cables to connect both the iPhone and Samsung phones to the one-click phone transferring software at the same time. They will be detected by the software and appear at the plac es of "Source" and "Destination". If you need to change their places, you can click the "Flip" button.


Step 3. Start to transfer files from iPhone to Samsung phone

After above steps, you can choose the files you want to transfer by ticking the checkbox in front of the items, including contacts, text messages, photos, videos, songs, call logs, etc. Then, click the button of "Start Copy" to kick off the transfer process. When it over, you can disconnect the phones and check the transferred files on your Samsung phone.


------------------------------------------------------------------------------------------------------------------------------------------------------------


More related articles   


Transfer Contact s, Whatsapp messages from S3/S4/S5/Ace/Note to Galaxy J7

How To Transfer Data Between Samsung Galaxy And Sony Xperia Z5

Deleting Message History on Samsung Permanently

Rabu, 01 Juni 2016

Hard Reset Android HTC Desire 300

Hard Reset Android HTC Desire 300 | Unlock | Factory Reset | Pattern Unlock.


HTC Desire 300. Guide belajar kali ini akan berbagi guide tentang hard reset pada Android HTC Desire 300. perlu anda ketahui beberapa hal dasar sebelum memutuskan untuk membeli sebuah perangkat handphone baru, yaitu mulai cara untuk melakukan charging pada HTC Desire 300, cara untuk mengganti SIM Card pada HTC Desire 300, cara untuk menambah External memory, Sampai cara untuk melakukan master reset pada HTC Desire 300. Melakukan master reset atau juga dikenal dengan factory reset atau hard reset harus anda pahami sebagai dasar. Pengetahuan dasar tentang hard reset perlu anda ketahui karena beberapa alasan berikut mungkin menjadi dasar mengapa anda harus melakukan Hard Reset pada perangkat handphone anda. Yang pertama, Karena pada perangkat android HTC Desire 300 tersebut mengalami bootloop, yaitu posisi dimana handphone anda tidak dapat dinyalakan karena berhenti pada posisi logo. Yang kedua, saat anda lupa akan PIN atau Pattern Lock yang sedang anda aktifkan di HTC Desire 300, langkah paling mudah yang dapat anda lakukan adalah dengan melakukan Hard Reset. Yang ketiga, ketika anda akan menjual HTC Desire 300 tersebut, untuk menghilangkan dan menghapus semua data dan akun yang tersimpan anda harus melakukan hard reset pada android HTC Desire 300.

Sebelum anda melanjutkan proses hard reset pada HTC Desire 300, ada baiknya anda mengetahui spesifikasi HTC Desire 300, Device ini merupakan smartphone dengan layar LCD 4,5 inci bekerja pada sistem A ndroid OS 4.4.2 KitKat dan prosesor Quad-core 1.2 GHz sebagai mesin utamanya, serta dikombinasikan dengan RAM 1 GB, kamera utama 8 MP, serta kamera sekunder 2 MP.

#1.Langkah Hard Reset Android HTC Desire 300.


  1. Lakukan charging pada HTC Desire 300 hingga mencapai kira-kira 70%
  2. Matikan perangkat HTC Desire 300 anda.
  3. Setelah perangkat HTC Desire 300 anda mati, lanjutkan dengan tekan dan tahan tombol volume Down dan Tombol Power secara bersamaan kira-kira 5 detik.

  4. Lepaskan semua tombol ketika anda melihat logo .
  5. Kemudian jika anda melihat layar tampil seperti gambar dibawah ini, maka tekan tombol power sekali saja.
    Hard Reset HTC Desire 300
    Hard Reset HTC Desire 300 
  6. Sekarang layar anda akan menampilkan factory reset, gunakan Tombol Volume Up dan Volume Down untuk memilih menu, dan gunakan Tombol Power untuk memilih atau mengeksekusinya.

    Hard Reset HTC Desire 300
    Hard Reset HTC Desire 300 
  7. Proses ini akan berjalan beber apa detik, dan setelah proses selesai HTC Desire 300 akan reboot. Tunggu beberapa saat sampai handphone siap anda gunakan kembali.
  8. Selesai

#2.Langkah Hard Reset Android HTC Desire 300.

  1. Hidupkan perangkat HTC Desire 300 Anda menggunakan tombol Power. 
  2. Buka Menu dan pilih Settings dan kemudian tekan Backup & Restore. 
  3. Cari Reset telepon dan pilih. 
  4. Tandai Reset Phone sekali lagi dan tekan OK untuk mengkonfirmasi operasi hard reset.

HTC Desire U Among Intermediate ICS Mobile Has Comes with a price of USD 275

Rumored that HTC as one of the mobile phone and gadget manufacturers are now trying to compete by presenting a number of tools aimed at the middle to lower back where the HTC released a phone to the ranks of the HTC Desire U which this phone design and has nearly the same HTC Desire with C.

As we all know that mobile phones are the HTC Desire U or re-generation of HTC Desire C but a fresh design and appearance of inter-face is even newer HTC sense coupled with Beat Audio feature for music player in it.

Specifications of the HTC Desire U, among others, is to have a 4 inch screen with a resolution of 480 x 800 pixels, running the operating system Android 4.0 Ice Cream Sandwich (ICS), do not miss the pinned-capable 5 megapixel resolution camera coupled with auto focus and LED fl ash camera this is on the back of the phone.
Google Images
HTC Desire U is supported by 512 MB RAM and internal storage of 4 GB MicroSD card slot, there is also additional storage capacity as a facility for the user. In addition it is also equipped with microUSB 2.0 port that serves as the charging and data transfer. For the siz e of the handset is measuring 118.5 x 62.3 x 9.32 mm and weighing 119 grams, of course, the phone is equipped with a battery that has a capacity of 1650 mAh.

Regarding the price of this phone is priced at USD 275. Currently presenting the new HTC phones in the Chinese market and is available in two colors namely White and Black. Are you interested in laneways have a cell phone with affordable price, but pinned with Premium feature specifications of HTC.

HTC Desire U user manual guide pdf is not yet available, please wait for mobile will be released

Tutorial Cara Flash Stock ROM LG G Pro Lite D686 Secara OFFLINE

[Tutorial] Cara Flash Stock ROM LG G Pro Lite D686 Secara OFFLINE


Melakukan flash atau flashing pada handphone Android sama halnya dengan proses install ulang pada perangkat komputer atau PC, sehingga dengan melakukan flashing anda akan mendapatkan performa awal seperti halnya baru saja keluar dari pabrik. Jadi flash LG G Pro Lite D686 ini dapat anda lakukan jika LG G Pro Lite D686 sudah tidak merespon dan tidak bisa nyala, atau istilah lain adalah bootloop. atau mungkin dengan keadaan tertentu yang memungkinkan anda untuk melakukan flash tersebut.terdapat dua metode yang dapat anda terapkan untuk melakukan flash pada LG G Pro lite ini, yaitu metode Online dan Metode Offline

Produk LG kali ini adalah LG G PRO LITE (DUAL) D686, merupakan smartphone dengan layar LCD 5,5 inci Produk cantik dari salah satu produsen telekomunikasi dan elektronik terkenal asal Korea yaitu LG. LG G PRO LITE (DUAL) D686 hadir dengan prosesor quad core buatan qualcom yang dikombinasikan dengan RAM 1 GB, LG G PRO LITE (DUAL) D680 / D682TR / D686 adalah smartphone dengan layar LCD 5,50 inci 540 x 960, didukung oleh prosesor 1 GHz sebagai dapur pacu, bersama 1 GB RAM dan kamera belakang 8 megapixel. Secara default samartphone ini dibesut dibawah sistem operasi android Jelly Bean 4.1.2, namun demikian masih bisa kita upgrade menjadi Kit Kat 4.4.2.atau Upgrade menjadi Android Lollipop 5.0.

Flash Stock ROM LG G Pro Lite D686< /a>
Flash Stock ROM LG G Pro Lite D686

Spesifikasi LG G PRO LITE (DUAL) D686

  • Network 3G HSDPA (Single GSM for LG G Pro Lite)
  • Network 3G HSDPA (Dual GSM for LG G Pro Lite Dual)
  • LCD 5.5 inches IPS
  • Processor Dual-core 1 GHz Cortex-A9
  • Main Camera 8 MP, 3264 x 2448 pixels, autofocus, LED flash

Kelebihan LG G PRO LITE (DUAL) D686

  1. Menggunakan sistem operasi yaitu android Jelly bean versi 4.1.2
  2. Tertanam Prosesor dual core dengan kecepatan 1 Ghz buatan MediaTek yaitu MT6577
  3. Dengan GPU atau bagian pengolahan grafi s PowerVR SGX531, yang cukupan
  4. Ram sebesar 1 GB, sehingga cukup nyaman dalam melakukan multasking (menjalankan aplikasi secara bersamaan)

Kekurangan LG G PRO LITE (DUAL) D686

  1. Tidak dilengkapi dengan HDMI
  2. Tidak dilengkapi dengan NFC
  3. Dimensi yang cukup lebar 150.2 x 76.9 x 9.4 mm, sehingga kurang cocok ketika dimasukkan dalam saku pakaian yang sempit.

Langkah Upgrade LG G PRO LITE (DUAL) D686.

  1. Pastikan Anda telah memiliki LG Driver yang sudah terinstal, jika belum download disini
  2. Download LG Flash Tool 2014 tool dan extract
  3. Setting LG G Pro lite ke< b> Download Mode dengan cara meng-OFF kan, kemudian colokan kabel usb ke ponsel, tahan tombol volume atas bersamaan dengan waktu memasukkan kabel usb ke komputer;

  4. PERHATIAN : Ingat copy file KDZ ke folder LG Flash Tool 2014. Download KDZ file
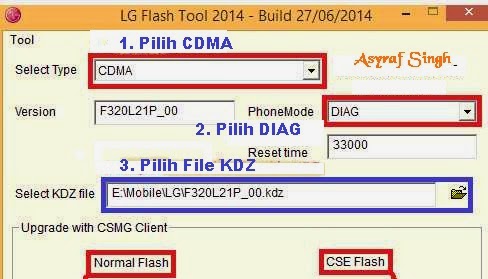
  5. Jalankan LGFlashTool2014.exe dan lakukan sesuai gambar dibawah ini.
    Flash Stock ROM LG G Pro Lite D686
    Flash Stock ROM LG G Pro Lite D686
    Flash Stock ROM LG G Pro Lite D686
    Flash Stock ROM LG G Pro Lite D686
  6. Jika Anda tidak dapat menjalankan LGFlashTool2014.exe, Silahkan install Visual C ++ Runtime Library. Download disini.
  7. Terdapat 2 metode flash yang digunakan yakni ;
    • Normal Flash : artinya anda melakukan Flash ROM tanpa kehilangan data apapun. Silahkan gunakan metode ini ketika Anda harus memperbaiki kesalahan sistem. Waspadalah terhadap boot loop saat flashing ROM yang berbeda dari ROM saat ini di ponsel atau MOD ROM .
    • CSE flash: Pilih opsi ini ketika Anda membutuhkan full fresh format. Semua data akan hilang. Ini cocok untuk meng-upgrade atau downgrade ROM atau hanya menggunaka n ini ketika Anda harus kembali ke Stock Rom.
  8. Anda juga perlu mengatur bahasa yang digunakan, secara default bahasa yang dipakai adalah inggris.

Perlu anda perhatikan

  • Telepon Anda mungkin akan restart / mengubah modus beberapa kali selama prosedur upgrade.
  • Jangan mencabut kabel USB / baterai dari telepon selama proses upgrade.
  • Setelah update selesai Anda akan mendapatkan pesan yang menunjukkan keberhasilan flash dari perangkat lunak terbaru. Sekarang Anda dapat mencabut perangkat Anda dan menggunakannya secara normal.
Misalkan terjadi bootloop setelah upgrade maka yang perlu Anda lakukan adalah Hard Reset untuk menghapus kustomisasi dan User data lama. Buka halaman ini untuk melakukan hard reset.

Guide To Flash MIUI On Bootloop Bricked Xiaomi Mi 4c in Fastboot Mode via Flashtool

Guide To Flash MIUI On Bootloop / Bricked Xiaomi Mi 4c in Fastboot Mode via Flashtool.

Flash MIUI On Bootloop / Bricked Xiaomi Mi 4c. Many ways you can do to fix a bootloop / bricked in Xiaomi Mi 4c. I think as a android user you know what is the meaning of bootloopSome people say that bootloop is a problem that occured on an android system which the android system could not start up going to the homescreen menu. And its happened is automatically return to the initial state on the first time when you turn on the Xiaomi Mi 4c.  And the device will stop to display on the smartphone logo.

Most of people when the y flash his Xiaomi Mi 4c is using flash mode on flash tool mode selector. But now, on Xiaomi Mi 4c. I will share a simple trick that can you do to flash your Xiaomi Mi 4c using fastboot mode.

Before you continue to follow this guide, Its better you know detail spesification of this devices. Xiaomi Mi 4c released on market at 2015, September. Xiaomi Mi 4c is the smartphones that comes with IPS LCD capacitive touchscreen, 16M colors, 5,0 Inches LCD , Android OS, v5.1.1 (Lollipop), and supported with Mediatek Qualcomm MSM8992 Snapdragon 808 chipset, Quad-core 1.44 GHz Cortex-A53 CPU, GPU Adreno 418, combined with 2 GB of RAM as their  engine. And you can enjoy exciting 13 MP on main camera, and 5 MP on secondary camera to capture your best moments on your life.
Flash MIUI On Bootloop / Bricked Xiaomi Mi 4c

Now, Following this guide step by step carefully.

Flash MIUI On Bootloop / Bricked Xiaomi Mi 4c Via Fastboot Mode And Flashtool.

  1. We must using PC or computer with windows operating system based. As suggesstion use windows 7 or higher.
  2. Make sure that your Xiaomi Mi 4c device is fully charged, Or you can provide minimum 80% of battery life.
  3. This guide will help you update your device to the latest MIUI ROM version.
  4. All user data, account, and file stored on this process will be deleted..

  5. For best suggesstion, Please back up your data stored on phone memory.
  6. Download and i nstall MIUI ROM Flashing Tool, Here.
  7. Download MIUI ROM version for Xiaomi Mi 4c,

    • Xiaomi Mi 4c Latest China Stable Version, Here

  8. After download complete, Please check if the ROM file extension is tgz. If it is .gz, please rename it to tgz

  9. Turn off the Xiaomi Mi 4c device. 
  10. Press the Volumeâ€" key and the Power button at the same time to enter Fastboot mode. And you will see like this picture.
    Fastboot mode Xiaomi Mi 4c
    Fastboot mode Xiaomi Mi 4c
  11. Then connect the device to the Windows PC via a micro USB cable
  12. Double click on the downloaded ROM file to decompress it. 
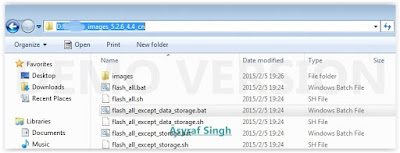
  13. Then Open the file folder for the decompressed R OM pack, and copy its path on the computer.
    MIUI ROM Xiaomi Mi 4c
    MIUI ROM Xiaomi Mi 4c
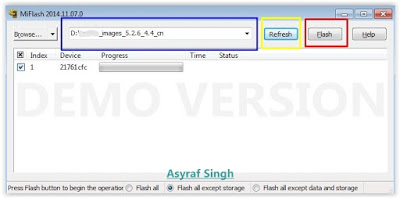
  14. Now Open Miflash.exe and paste into the address bar the ROM file folder path copied in the last step.
    Miflash Xiaomi Mi 4c
    Miflash Xiaomi Mi 4c
  15. Then click Refresh button to refresh MiFlash Tool, and MiFlash should automatically recognize the Xiaomi Mi 4c device.
  16. To start flash ROM file to your device, you can click Flash Button.
  17. Now, wait until the progress bar inside MiFlash turns fully green, which means the ROM has been successfully installed. Then your device should automatically boot to the new version..
    miflash Xiaomi Mi 4c
    miflash Xiaomi Mi 4c
  18. Finish

iPad Mini Will Available in 24 models

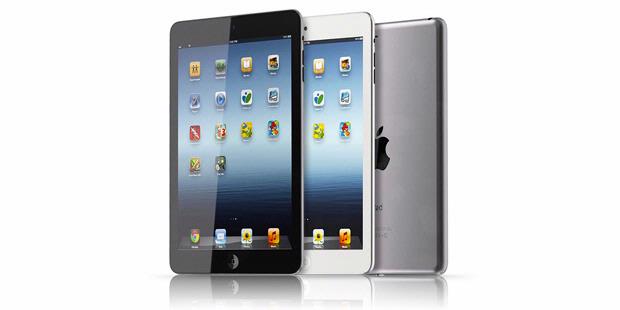
iPad Mini Will Available in 24 models? - New information on the 7.85-inch iPad Mini tablet keeps popping up as the approach of October 23, said to be the launch device.
iPad Mini


Apple Insider site publishes a list Stock-Keeping Units or SKUs iPad Mini. A total of 12 variants of the tablet configuration shown in the list, which consists of 4 models: P101, P103, P105, and P107.

According to sources quoted by the site, the model number it represents four different storage capacities.
One of capacity options that may be numbered 8 GB used in entry-level version of the iPad mini iPad mini storage so the choice to be 8, 16, 32, and 64 GB. So far, the iPad tablet from Apple provides the smallest capacity of 16 GB.

Multiply the 12 variant configurations with a choice of colors, amounting to 2 pieces (black and white, called variant "A" and "B"), then the entire iPad Mini models to choose from are 24 types.

The four models of iPad Mini spiked with additional information such as ranking "good", "better" and "best". According to Apple Insider, the ranking is based on three different connectivity features, the "WiFi Only", "3G" and "4G LTE".

Apple reported already begun to spread the invitation to introduction iPad Mini on October 23. The price, according to leaks from a German website, starting from 249 euros or $ 3.1 million for variant 8 GB WiFi Only